
Disclosure: As an Amazon Associate, I may earn from qualifying purchases.
That steady drip at 2 a.m. is more than annoying. If you are searching for how to fix dripping faucet problems, the good news is that many of them come down to a worn part, a loose connection, or the wrong replacement piece – not a full fixture replacement.
I have seen homeowners ignore a small faucet drip for months because it seemed harmless. Then the water stain shows up, the sink hardware starts corroding, or the water bill creeps higher than expected. A dripping faucet is one of those repairs that is often simple if you catch it early and work methodically.
Why a faucet keeps dripping
A faucet drips when water is still getting past a seal after the handle is shut off. That seal might be a rubber washer, an O-ring, a cartridge, or a ceramic disc, depending on the faucet style. The repair is not the same for every faucet, which is where many DIY attempts go wrong.
Hard water buildup can also keep parts from sealing properly. In older homes, worn valve seats and mineral deposits are common. In newer faucets, the problem is often a failing cartridge or a loose internal component. Sometimes the faucet itself is not the true cause. High water pressure can make a faucet drip at certain times of day, especially at night.
Start here before you take anything apart
Before you begin, shut off the water supply under the sink. Turn on the faucet to release pressure and confirm the water is off. Put a towel in the sink and cover the drain so small screws or clips do not disappear.
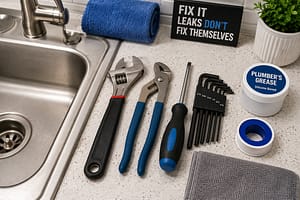
Have a few basic tools ready: an adjustable wrench, screwdriver set, Allen key set, slip-joint pliers, plumber’s grease, a rag, and replacement parts. If you know the faucet brand and model, that helps. If not, take clear photos before disassembly and bring the old part with you when buying replacements.
This is one repair where forcing parts usually makes the job bigger. If something does not move easily, check for a hidden set screw, retaining clip, or mineral buildup before applying more pressure.
How to fix a dripping faucet by faucet type
The most important step is identifying what kind of faucet you have. The internal parts are different, and so is the repair.
Compression faucet

A compression faucet usually has two handles, one for hot and one for cold, and you tighten the handle down to stop the water. These are common in older homes.
Remove the decorative cap, take out the handle screw, and lift off the handle. Then use a wrench to remove the packing nut and stem assembly. At the bottom of the stem, you will usually find a rubber washer secured by a screw. If that washer is worn, hardened, or uneven, replace it with the exact same size. While you are there, inspect the valve seat inside the faucet body. If it is rough or damaged, the new washer may fail quickly.
A worn O-ring near the stem can also cause drips or handle leaks. Replacing both the washer and O-ring at the same time is often the smart move on an older compression faucet.
Cartridge faucet
A cartridge faucet can have one or two handles, and the internal cartridge controls water flow. When these drip, the cartridge is usually the main suspect.
After removing the handle, look for a retaining clip or nut that holds the cartridge in place. Pull the cartridge straight out. Some come out easily, while others are stuck by mineral deposits. Work slowly so you do not crack the faucet body.
Match the replacement cartridge carefully. Even a part that looks close may not seat correctly. Before installing the new one, clean the inside of the faucet body and apply a small amount of plumber’s grease to approved areas. Then reassemble and test.
Ball faucet
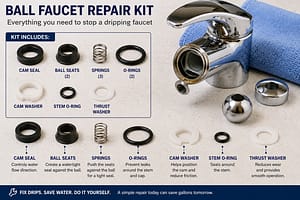
Ball faucets are common in single-handle kitchen sinks. They contain a ball assembly, springs, and rubber seats.
If a ball faucet is dripping from the spout, the rubber seats and springs are often worn. Repair kits are widely available and usually make more sense than replacing one piece at a time. Disassemble the handle and cap, remove the ball, and inspect the springs, seats, and cam. Replace worn parts, clean away mineral buildup, and reassemble in the correct order.
This style has more small parts than the others, so keep them organized as you go.
Ceramic disc faucet
Ceramic disc faucets are durable, but they can still drip if the seals wear out or debris interferes with the disc operation.
Remove the handle and access the disc cartridge. Lift it out and inspect the rubber seals on the underside. Sometimes cleaning the cartridge and replacing the seals is enough. If the ceramic surfaces are damaged, replace the full cartridge.
Be careful here. Ceramic components are strong in use but can chip if handled roughly.
Common mistakes when fixing a dripping faucet
The biggest mistake is buying parts by guesswork. A washer that is slightly too small or a cartridge that almost fits can leave you right back where you started. Exact match matters.
Another common problem is skipping cleanup. If mineral deposits or debris remain inside the faucet body, the new part may not seal properly. Clean mating surfaces gently with a cloth or soft brush.
Overtightening is another issue. People assume tighter means better, but overtightening can damage seals, crack parts, or make the handle hard to operate. Snug is usually enough.
When the drip is not really the faucet
If you replace the internal parts and the faucet still drips, step back and look at the bigger picture. In some homes, excessive water pressure causes intermittent dripping even when the faucet itself is in decent shape. If you notice banging pipes, pressure fluctuations, or multiple fixtures acting strangely, check the system pressure.
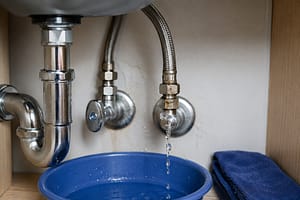
You should also inspect around the base of the faucet and under the sink. Sometimes what looks like a faucet drip is actually water leaking from a loose supply line, a cracked escutcheon seal, or condensation. Diagnosis matters just as much as the repair.
How to know when repair is worth it
Not every dripping faucet should be repaired. If the faucet body is corroded, replacement parts are unavailable, or the fixture is of very low quality, replacing the whole faucet may save time and frustration.
That said, many good faucets are absolutely worth repairing. A quality faucet with a failed cartridge or washer can often be restored quickly and last for years. The trade-off comes down to age, condition, and part availability. If you are spending money on multiple internal parts and the finish is already failing, replacement starts to make more sense.
When to call a plumber

DIY works well when the shutoff valves function, the faucet can be disassembled without damage, and the issue is clearly isolated to a worn internal part. It is time to call a plumber if the shutoff valves do not hold, the faucet is seized in place, parts are broken off inside, or the source of the leak is uncertain.
You should also get help if the drip is tied to broader plumbing symptoms, such as high pressure, pipe noise, recurring leaks, or water damage in the cabinet. A small faucet repair can uncover a larger system problem, especially in older properties or commercial spaces.
For homeowners who want practical guidance grounded in real field work, this is exactly the kind of repair where a calm, step-by-step approach saves money and avoids unnecessary replacement.
How to prevent the next faucet drip
Once the faucet is working again, a little prevention goes a long way. Do not crank handles shut with extra force. That habit wears washers and seals faster. If you live in an area with hard water, clean mineral buildup regularly around fixtures and aerators.
It also helps to address small plumbing changes early. A stiff handle, a slight drip, or mineral crust around the spout is your warning sign. Repairs are usually easier before parts become frozen in place or start damaging the fixture.
If you keep a few basic tools on hand and learn your faucet type, the next repair will feel much less intimidating. Most dripping faucets are not complicated. They just require the right part, a little patience, and the discipline to fix the root cause rather than guessing.
A faucet should shut off cleanly and stay that way. If yours does not, treat the drip like the early signal it is, not background noise you have to live with.
Recommended Tools & Plumbing Guide
As a plumber with over 20 years of experience, I’ve seen how the right tools can make the difference between a quick fix and major damage. I’ve put together a list of trusted plumbing tools and leak detection products that homeowners can use to catch problems early and protect their homes.
👉 Browse my recommended tools and products here
📘 Get my practical plumbing guide:
https://www.amazon.com/dp/B0F9ZZJCJG
— Ainsworth Dickenson
Your Go-To Plumbing Expert