You flush once, walk away, and the toilet keeps running after flush like it never got the message. That sound is easy to ignore for a day or two, but it wastes water fast and usually points to a simple part inside the tank that is not doing its job.
Most of the time, this is not a full toilet replacement problem. It is a tank adjustment, a worn seal, or a stuck fill valve. The good news is that many homeowners can figure it out in under 15 minutes with no special plumbing experience.
Why a toilet keeps running after flush
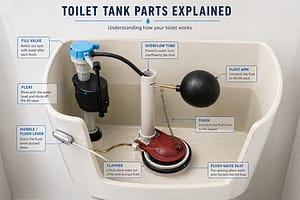
A toilet tank works on a simple cycle. You flush, the flapper lifts, water leaves the tank and enters the bowl, then the fill valve refills the tank until the float reaches the shutoff point. If any part of that cycle does not finish cleanly, water keeps moving, and you hear that steady running sound.
In the field, the most common causes are a flapper that does not seal, a chain that is too tight or tangled, a float set too high, a leaking overflow tube issue, or a fill valve that no longer shuts off properly. Sometimes there is more than one problem at the same time, especially in older toilets.
The trick is to determine whether water is leaking from the tank or whether the fill valve is overfilling it. Those are two different problems, and they lead you to two different fixes.
Start with a quick tank check
Take the tank lid off carefully and set it somewhere safe. Flush the toilet and watch what happens inside the tank. You do not need to touch anything yet. Just observe the sequence.
If the water level rises and then continues to climb into the overflow tube, the fill valve or float adjustment is the issue. If the tank fills, then stops and starts filling again every so often, water is likely leaking past the flapper, and the fill valve is turning back on to make up for the lost water.
That one observation saves time. It tells you whether to focus on the refill side or the sealing side.
Check the flapper first

The flapper is the rubber or silicone valve at the bottom of the tank. When it gets warped, stiff, dirty, or misaligned, it lets water leak slowly into the bowl. That leak may be small, but it is enough to trigger the fill valve repeatedly.
Reach in and feel the flapper seat if the water is off and the tank is mostly empty. Mineral buildup, slime, or rough spots can prevent a tight seal. If the flapper looks worn or feels brittle, replacing it is usually the smartest move. It is inexpensive and often fixes the problem right away.
Also, check the chain connected to the flush handle. If it is too short, it can hold the flapper slightly open. If it is too long, it can get caught underneath the flapper when it drops. You want just a little slack – enough for the flapper to close fully, but not so much that the chain snags.
Check the water level and float

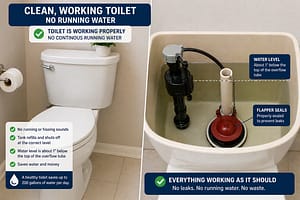
Look for the marked water line inside the tank. The water should usually sit about 1 inch below the top of the overflow tube. If it is too high, water spills into the tube, and the toilet keeps refilling.
On older toilets, you may have a float ball on a metal arm. On newer models, the float is often a cup that slides up and down the fill valve shaft. In either case, lowering the float lowers the shutoff point. A small adjustment can solve a constant running problem in seconds.
If you lower the float and the water continues to rise, the fill valve is probably not shutting off correctly. At that point, adjustment may not be enough.
How to fix the most common causes
If the flapper is leaking
Turn off the water supply valve behind the toilet and flush to empty the tank. Remove the old flapper and match it carefully if you are replacing it. Not every flapper fits every toilet, and the wrong one can create a new problem.
Before installing the new flapper, wipe the flush valve seat clean. That small step matters more than people think. Even a new flapper will leak if it sits on a dirty or uneven surface.
Once the new flapper is in place, reconnect the chain with a slight amount of slack, turn the water back on, and test the flush. If the toilet fills and stays quiet, you have found the issue.
If the chain is the problem
This is the easiest fix. Shorten or lengthen the chain so the flapper can open fully and then drop without interference. Do not make it tight. A tight chain is a common DIY mistake and one of the fastest ways to create a phantom running toilet.
Flush a few times and watch the chain each time. If it moves cleanly and settles without catching, you are good.
If the float is set too high
Adjust the float according to the toilet style. A screw on top of the fill valve or a clip on the side usually controls the level on newer toilets. Turn or slide it until the water stops below the overflow tube.
Make small adjustments and test after each one. If you overcorrect, the toilet may not refill enough for a strong flush. This is one of those it-depends situations. You want the lowest water level that still gives you a complete flush.
If the fill valve keeps running

A fill valve can stick, wear out internally, or get clogged with debris. Sometimes flushing out the valve helps. With the water off and the cap removed in accordance with the manufacturer’s instructions, you can briefly turn the water on to clear debris. But if the valve is older or inconsistent, replacement is usually the better long-term fix.
Replacing a fill valve is still a manageable DIY repair for many homeowners. You will need to shut off the water, drain the tank, disconnect the supply line, remove the old valve, and install the new one at the correct height. If that sounds straightforward, go for it. If not, this is a reasonable point to call a plumber to avoid a tank leak caused by a bad installation.
When the problem is not obvious
Sometimes the toilet runs only once in a while. That usually means a slow leak from the tank into the bowl. A simple dye test helps. Put a few drops of food coloring in the tank, wait 15 to 20 minutes without flushing, and check the bowl. If color appears in the bowl, water is slipping past the flapper.

In other cases, the refill tube is pushed too far down into the overflow tube, creating a siphon effect and causing the fill valve to cycle strangely. The refill tube should clip above the overflow opening, not be shoved deep inside it.
Cracks in the overflow tube or flush valve assembly can also cause persistent running, though that is less common than a bad flapper or fill valve. If you have replaced the easy parts and the problem keeps coming back, that is when experience matters. There may be a compatibility issue with the replacement part, hidden mineral buildup, or wear in the tank hardware itself.
When to handle it yourself and when to call a plumber
If the toilet is accessible, the shutoff valve works, and the issue is clearly the flapper, chain, or water level, this is a very reasonable DIY repair. These are low-cost parts, and the risk is manageable if you take your time.
Call a plumber if the shutoff valve is stuck, the supply line leaks when touched, the tank bolts are corroded, or the fill valve replacement turns into more than a simple swap. Also, call if the toilet runs and you cannot identify why after basic checks. Chasing the wrong part wastes time and money.
For property managers and owners of older units, repeated complaints about running toilets can point to hard-water wear across multiple fixtures. In that case, fixing one toilet helps, but the bigger win is standardizing replacement parts and checking the rest before they fail.
How to keep the toilet from doing it again
Toilet parts wear slowly, which is why running toilets often seem to come out of nowhere. A quick tank inspection every few months helps you catch chain issues, rising water levels, and flappers that are starting to deform.
Avoid drop-in tank cleaners if the manufacturer warns against them. Some chemical tablets shorten the life of rubber seals and gaskets. You save a little on cleaning and then spend more on repairs.
If you want dependable results, use quality replacement parts and match them to the toilet model when possible. That is the kind of small decision that prevents repeat callbacks and frustration. It is also the approach we use at Ainstheplumber – fix the actual cause, not just the symptom.
A running toilet is usually a small repair with a big payoff. Quiet tank, lower water bill, and no guesswork hanging over your head the next time you flush.
Recommended Tools & Plumbing Guide
As a plumber with over 20 years of experience, I’ve seen how the right tools can make the difference between a quick fix and major damage. I’ve put together a list of trusted plumbing tools and leak detection products that homeowners can use to catch problems early and protect their homes.
👉 Browse my recommended tools and products here
📘 Get my practical plumbing guide
— Ainsworth Dickenson
Your Go-To Plumbing Expert