A sink that starts draining slowly usually gives you a warning before it stops completely. You wash your hands, rinse a dish, or run the faucet for a few seconds, and the water hangs there longer than it should. If you are wondering how to unclog a sink drain without making the problem worse, the good news is that many clogs can be cleared with a few basic tools and the right order of steps.
The key is not to jump straight to the harshest fix. In real plumbing work, the fastest solution is not always the smartest one. Some clogs sit close to the drain opening and come out easily. Others are packed into the trap under the sink. A few are deeper in the branch line, and that is where homeowners can waste time trying the same trick over and over when the blockage needs a different approach.
Start with the simplest diagnosis
Before you touch anything, figure out what kind of sink you are dealing with and how severe the clog is. A bathroom sink usually clogs from hair, toothpaste, soap scum, and grooming products. A kitchen sink is more likely to clog from grease, food particles, coffee grounds, or starchy residue.
Also, pay attention to whether one fixture is affected or several. If only one sink is slow, the blockage is usually local to that sink. If the sink backs up when the dishwasher runs, or if multiple drains in the home are acting up, that points to a bigger drainage issue. At that stage, forcing ahead with DIY methods may not solve much.
You should also stop using the sink while troubleshooting. Every bit of extra water makes cleanup harder, especially if you need to open the trap.
How to unclog a sink drain step by step
The safest order is simple: remove what you can near the top, flush loose items, then move under the sink if needed, and only then use a snake. That sequence avoids unnecessary mess and reduces the chance of damaging older plumbing.
Step 1: Remove visible debris
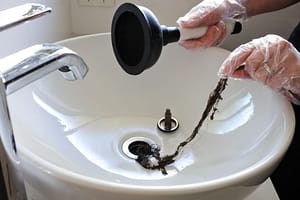
If the sink has standing water, scoop out enough to work comfortably. Then remove the stopper or drain screen. In many bathroom sinks, the stopper lifts out after a slight twist, though some are connected to a pivot rod underneath and need to be loosened first.
Once the opening is clear, use a plastic drain tool, a zip-style hair remover, or even a gloved hand to pull out hair, sludge, and soap buildup. This part is unpleasant, but it solves a surprising number of bathroom sink clogs right away.
If this is a kitchen sink, look for food debris around the basket strainer and clean that area thoroughly. Do not assume hot water alone will push everything through.
Step 2: Try hot water the right way
After removing surface debris, flush the drain with hot water. For bathroom sinks, hot tap water is usually enough. For kitchen sinks with grease buildup, very hot water can help soften residue, but there is a trade-off. Boiling water is fine for metal drain lines, but it is not always a good idea for older PVC fittings or sinks with delicate seals. If you are unsure, use very hot tap water instead of a full kettle of boiling water.
Run the water in stages rather than all at once. A short burst followed by a pause tells you whether the clog is loosening or if the line is still blocked.
Step 3: Use a plunger correctly

A sink plunger works, but only if you set it up properly. Many people plunge with too much air in the cup or with another drain opening left uncovered, which cuts the pressure you need.
If you have a double kitchen sink, seal the second basin with a stopper or a wet rag. In a bathroom sink, cover the overflow opening with a damp cloth. Add enough water to cover the plunger cup, then use firm, controlled strokes for 15 to 20 seconds. You are trying to create pressure and suction, not brute force.
If the water starts draining better after a few rounds, flush with hot water again. If nothing changes, move on.
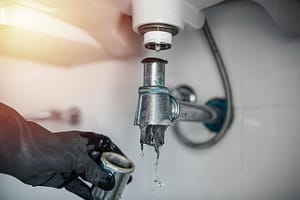
When to open the trap
If the clog has not cleared by now, there is a strong chance it is sitting in the P-trap under the sink. This curved section is designed to hold water and block sewer gases, but it also catches debris.
Place a bucket under the trap and keep a few towels nearby. Loosen the slip nuts by hand or with channel-lock pliers if they are stuck. Once the trap comes off, dump the contents into the bucket and inspect the inside. In kitchen sinks, this is where grease and food sludge often collect. In bathroom sinks, expect hair, soap residue, and thick buildup.
Clean the trap completely before reinstalling it. While it is off, check the short horizontal section leading into the wall. If you can see buildup there, remove what you safely can. Reassemble the trap, tighten the fittings snugly, and run water to check both drainage and leaks.
This is often the point where a homeowner gets the drain working again. If not, the clog is likely farther down the line.
Use a drain snake before you reach for chemicals
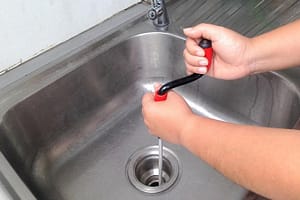
If you need to go deeper, use a hand snake or a small drain auger. Feed the cable into the drain line slowly until you feel resistance. Tighten the lock, rotate the cable, and work it forward a little at a time. Do not rush this part. If you force the cable, it can bind or skip past the clog.
When you feel the blockage break up or hook onto the cable, pull the snake back out and clean it off. Then test the drain with water. You may need two or three passes, especially in kitchen lines where grease coats the pipe walls.
This is one reason many experienced plumbers prefer mechanical clearing over liquid drain cleaners. A snake removes the blockage. Chemicals often just burn through a narrow path or sit in the line if the drain is fully blocked.
Why liquid drain cleaners are usually a poor first choice
Chemical drain cleaners are popular because they seem easy to use. In the field, they create plenty of avoidable problems. They can damage certain pipes, weaken old fittings, and create a safety hazard if you later have to open the trap or snake the drain. Mixing products is even riskier.
There are situations where a milder enzyme-based product may help with maintenance, especially in slow drains with organic buildup. But for an active clog, chemicals are rarely the best first move. If the sink is already holding water, the product may never reach the blockage effectively.
How to unclog a sink drain in the kitchen vs. the bathroom
The method is similar, but the cause changes the strategy.
In a bathroom sink, always suspect the stopper assembly first. Hair wraps around it, and that buildup can be thick enough to block flow almost completely. Removing and cleaning the stopper often solves the problem faster than anything else.
In a kitchen sink, grease is the usual culprit. That means hot water and plunging may help at first, but if the clog has hardened in the trap or branch line, you will probably need to disassemble the trap or use a snake. Garbage disposals add another variable. If the disposal hums but does not spin, or if water backs up into both basins, the issue may involve the disposal chamber or the drain line connected to it.
Signs the clog is bigger than the sink
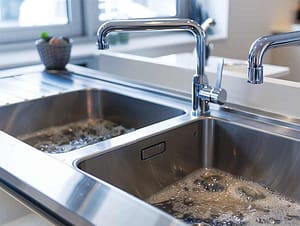
There is a point where smart DIY turns into wasted effort. If water backs up into another fixture, if the sink gurgles when nearby plumbing is used, or if multiple drains are slow, the blockage may be deeper in the system. The same is true if you clear the sink and it clogs again almost immediately.
That can point to a buildup farther down the branch drain, poor venting, or a developing main line problem. In homes with older plumbing, grease, scale, and partial collapses are not rare. In commercial spaces, heavy use can make recurring clogs more stubborn than they first appear.
If you reach that stage, a proper inspection and professional cable machine are usually the better path. Ainstheplumber handles those real-world calls often, especially when a simple sink clog turns out to be part of a larger drainage issue.
Prevent the next clog
Once the line is clear, a few habits make a real difference. Keep hair catchers in bathroom sinks. Avoid washing grease, oils, coffee grounds, rice, pasta, and fibrous food scraps down kitchen drains. Run water when using the garbage disposal, and do not treat the disposal like a trash can.
For bathroom sinks, clean the stopper regularly before buildup turns into a full blockage. For kitchen drains, flushing with hot water after greasy dishwashing helps, but it is not a cure-all if grease is being poured down the line in the first place.
If your sink is draining slowly today, handle it while it is still a small job. The best plumbing fixes are often the ones you do early, before a minor clog becomes a backup, a leak under the cabinet, or a weekend service call.
As a plumber with over 20 years of experience, I’ve seen how the right tools can make the difference between a quick fix and major damage. I’ve put together a list of trusted plumbing tools and leak detection products that homeowners can use to catch problems early and protect their homes.
👉 Browse my recommended tools and products here
— Ainsworth Dickenson
Your Go-To Plumbing Expert