The call usually comes in after the temperature drops fast. A homeowner opens a faucet, gets nothing, and then worries about what will happen when that pipe thaws. The best frozen pipe prevention tips are the ones you put in place before that cold snap hits, because once water freezes inside a pipe, the risk of a split or burst line goes up fast.
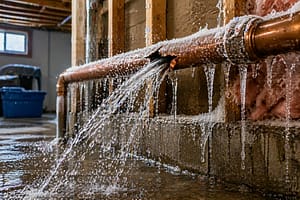
If you have ever dealt with water damage from a broken pipe, you already know this is not just a winter inconvenience. It can mean soaked drywall, damaged flooring, mold risk, and a repair bill that grows by the hour. The good news is that preventing frozen pipes is usually straightforward if you focus on the areas most likely to fail and deal with the weak spots early.
Frozen pipe prevention tips for the highest-risk areas
Not every pipe in a home has the same chance of freezing. Pipes running through heated interior walls are usually fine. Trouble starts in exposed places like crawl spaces, attics, garages, exterior walls, under sinks on outside walls, and near foundation vents. Those locations lose heat faster, and moving cold air can drop the pipe temperature enough to freeze the water inside.
Start by walking your property before the coldest part of the season. Look for any visible water lines in unheated or poorly insulated spaces. If a pipe feels especially exposed, treat that as a priority. In the field, the most common freeze-ups are not hidden in the center of the house. They occur when builders or previous repairs left piping close to the building’s outer shell.
Insulation helps, but it is not a heater. Foam pipe sleeves, fiberglass wrap, and similar products slow heat loss. That can be enough during normal cold weather, but it may not be enough during a hard freeze if the surrounding area stays below freezing for too long. Think of insulation as one layer of protection, not the whole plan.
Seal the cold air leaks first
One of the most overlooked frozen pipe prevention tips has nothing to do with the pipe itself. It is about stopping cold air from reaching it.
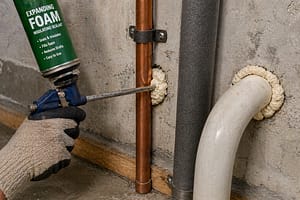
Small openings around utility penetrations, foundation gaps, dryer vents, and wall penetrations can let in a surprising amount of cold air. If that draft blows directly across a pipe, even an insulated one can freeze. Use caulk or expanding foam where appropriate to close gaps around plumbing and wiring penetrations. Weatherstrip doors to garages or utility rooms if those spaces connect to the house.
This matters most in crawl spaces and basements. If vents, access doors, or exterior gaps are left open during freezing weather, the temperature around the piping can drop quickly. Sealing those drafts often does more than wrapping another layer of insulation around the pipe.
Protect exposed pipes with the right materials
If you have pipes in vulnerable areas, insulating them is one of the quickest and cheapest upgrades you can make. Foam tube insulation is easy for most homeowners to install. Measure the pipe diameter, cut the sleeve to length, and ensure the seams are tightly closed. For elbows and valves, take your time. Gaps in those spots reduce the benefit.
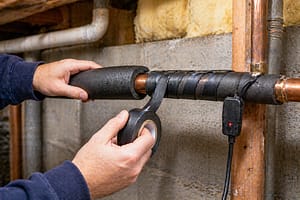
In harsher climates or especially exposed runs, heat tape or heat cable may be worth using. This depends on the pipe location and your confidence level. A properly installed heat cable can keep a line above freezing, but it must be used exactly as the manufacturer instructs. Overlapping the cable or using the wrong product on the wrong pipe material can create a hazard.
If you are deciding between basic insulation and a powered freeze-protection product, think about how cold that space gets and how long it stays cold. For a mildly cold garage wall, insulation may be enough. For a crawl space with a known freeze history, adding controlled heat protection may be the better call.
Keep indoor temperatures steady
A lot of pipes freeze when people leave town, lower the thermostat too low, and assume the house will hold enough warmth on its own. Sometimes it does. Sometimes one cold corner does not.
If freezing weather is expected, keep the home heated even if you are away. A common mistake is setting the thermostat extremely low to save money. Those short-term savings do not compare to the cost of a burst pipe cleanup. Keeping indoor temperatures consistent gives pipes inside walls and cabinets a much better chance of staying above freezing.
Interior doors can help with airflow, too. Open doors in rooms that do not get much heat circulation. For sinks on exterior walls, open the cabinet doors during severe cold so warmer room air can reach the pipes. That simple step can make a real difference overnight.
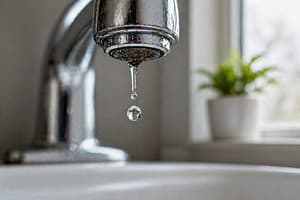
Let faucets drip when conditions are severe
When a hard freeze is coming, letting a faucet drip can reduce the chance of a pipe freezing solid. Moving water is harder to freeze than standing water, and the open faucet also relieves some pressure in the system. That pressure is often what turns a frozen section into a burst pipe.
This is not something you need to do every chilly night. It is most useful during sustained freezing conditions, especially if you already know a certain line is vulnerable. Choose the faucet served by the most at-risk pipe and let it run at a slow, steady drip.
If you are on a well or are trying to manage water use carefully, use judgment here. Dripping multiple fixtures for long periods is not always ideal. But for one problem line during a serious cold event, it can save you from major damage.
Disconnect and drain outdoor plumbing
Outdoor hose bibs and irrigation lines are common failure points. If a garden hose is still connected, water can stay trapped in the faucet body and the pipe behind it. When that freezes, the damage may not show until you turn the water back on and find a leak inside the wall.
Disconnect hoses before freezing weather starts. Drain and store them. Shut off and drain exterior faucet supply lines if your setup allows it. If your home has a separate shutoff for outdoor spigots, use it, then open the outside faucet to let any remaining water drain out.
Sprinkler systems need the same attention. Depending on the system design, they may need professional winterization to blow water out of the lines. Skipping that step can lead to cracked pipes, damaged valves, and expensive spring repairs.
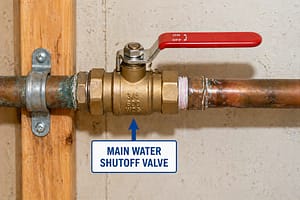
Know where your shutoff valve is before you need it
Prevention also means being ready if something starts to go wrong. If a pipe does freeze and split, every minute matters once it thaws. You do not want to be learning the location of your main shutoff while water is pouring into a wall or across the floor.
Make sure everyone responsible for the property knows where the main water shutoff is and how to use it. Test that the valve can actually turn. Older valves sometimes seize from lack of use. If yours is stiff or unreliable, replacing it before winter is a smart move.
This is one of those practical habits that homeowners skip because it feels optional. It is not optional when a line fails at 2 a.m.
Watch for warning signs before a full freeze
Pipes do not always go from normal to burst without warning. Reduced water flow, odd noises, frost on exposed piping, or one fixture suddenly running much slower than the others can all indicate that a pipe is starting to freeze.
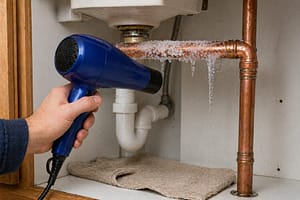
If you catch it early, you may be able to prevent damage. Increase the heat in the area, open cabinets, and warm the space gradually. A hair dryer can help with an accessible metal or plastic pipe under a sink, but never use an open flame or high-heat tool that can damage the pipe or start a fire.
If the frozen section is hidden inside a wall, or if you suspect the pipe has already cracked, stop and call a plumber. That is not the time for guessing.
Property managers and second-home owners need a stricter plan
If you manage rentals, vacant units, or a seasonal property, frozen pipe prevention tips need to be part of a routine, not a last-minute reaction. Empty buildings are riskier because small problems go unnoticed longer. A thermostat failure, an open vent, or a draft near a plumbing wall can lead to major damage before anyone notices.
Use temperature monitoring if possible, inspect vulnerable areas before cold weather, and do not assume one mild winter means the next one will be the same. Buildings with older insulation, previous remodels, or patched plumbing layouts often have hidden weak points.
This is where an experienced plumber can save you money by identifying problem areas before they fail. The plumber sees this pattern often in homes and light commercial properties, where the plumbing works fine most of the year, then struggles as soon as weather conditions change.
When prevention becomes repair
Sometimes, despite good planning, a pipe still freezes. If a faucet stops flowing, leave the faucet open and warm the pipe gradually if you can safely reach it. Start close to the faucet and work back toward the colder section. If water starts flowing again, keep checking for leaks as the pipe thaws fully.
If you see bulging, splitting, staining, or active leaking, shut off the water. At that point, your goal is damage control, not DIY pride. Frozen pipes can fool people because the break may not reveal itself until the ice melts and pressure returns.
The smartest approach is simple. Protect vulnerable areas, stop cold-air leaks, keep heat consistent, and prepare for the handful of places where your plumbing system is most likely to fail. A little attention before the freeze is always cheaper than cleanup after the thaw.
Recommended Tools & Plumbing Guide
As a plumber with over 20 years of experience, I’ve seen how the right tools can make the difference between a quick fix and major damage. I’ve put together a list of trusted plumbing tools and leak detection products that homeowners can use to catch problems early and protect their homes.
👉 Browse my recommended tools here
📘 Get my practical plumbing guide
— Ainsworth Dickenson
Your Go-To Plumbing Expert