Disclosure: As an Amazon Associate, I may earn from qualifying purchases.
A water bill jumps, a wall starts to smell musty, or a patch of the floor feels slightly warmer or softer than it should. That is usually how hidden leaks announce themselves – quietly, and after they have already been wasting water for a while. If you are trying to learn how to find hidden leaks, the goal is not just spotting water. It is narrowing down where the problem is, how serious it may be, and whether it is safe to keep investigating on your own.
Hidden leaks are different from a dripping faucet or a toilet that runs nonstop. They often sit behind walls, under slabs, above ceilings, or in irrigation and supply lines you rarely see. Some are slow enough to go unnoticed for months. Others can quickly damage framing, drywall, flooring, or cabinets. The sooner you catch the pattern, the better your options usually are.
Why hidden leaks are easy to miss
Most hidden leaks do not produce obvious puddles right away. Water can travel along framing, collect under finished surfaces, or evaporate before it becomes visible. That is why the source and the symptom are often in two different places. A stain on the ceiling may come from a bathroom several feet away. A warped baseboard may be tied to a pipe inside the wall, not the floor itself.
Pressure matters too. A drain leak may only show up when a fixture is used. A supply line leak can run constantly, even when nobody is home. That difference helps you test the system more intelligently.
First signs that point to a hidden leak
Before you start opening access panels or calling for equipment, pay attention to the clues your house is already giving you. A sudden increase in your water bill is one of the strongest signs, especially if your household habits have not changed. Low water pressure, moldy odors, peeling paint, bubbling drywall, stained ceilings, warm spots on the floor, or the sound of running water when everything is off can also point to a concealed leak.
Toilets are still worth checking first because they waste a lot of water and are often mistaken for hidden line leaks. If you can rule out toilets, faucets, and visible fixture connections, your search becomes more focused.
How to find hidden leaks with your water meter
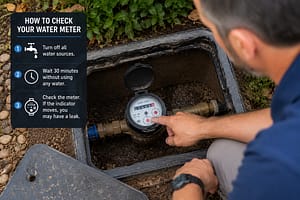
The water meter test is still one of the best first steps because it tells you whether water is moving somewhere in the system when it should not be.
Start by turning off everything that uses water inside and outside the property. That includes faucets, washing machines, dishwashers, ice makers, hose bibs, and irrigation, if you have it. Then look at the water meter. Many meters have a small leak indicator that spins even with a tiny amount of water movement.
Write down the reading and wait 30 minutes to an hour without using any water. Check it again. If the reading changes, you likely have a leak somewhere on the property.
This test does not tell you exactly where the leak is, but it confirms whether you are dealing with an active water loss problem. If the meter moves only when irrigation is on, the issue may be outdoors. If it moves all the time, you may be dealing with a pressurized line leak or a fixture problem that has not yet been identified.
Isolate the leak zone before you start opening walls
Once the meter suggests a leak, the next step is to narrow the problem area. This is where many homeowners save time and avoid unnecessary damage.
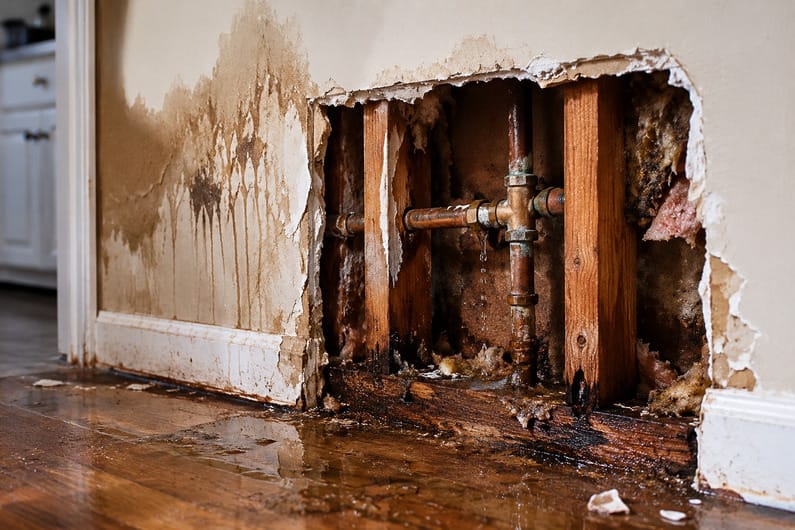
If your home has fixture shutoffs or branch shutoffs, use them one at a time and recheck the meter. For example, shut off the supply to a toilet, then test. Shut off the washing machine valves, then test again. If your water heater has isolation valves, that can help identify whether the leak is on the hot or cold side. A leak on the hot line may also leave warm spots on the flooring or accelerate moisture evaporation, making it harder to spot visually.
You can also pay attention to when the signs appear. If staining gets worse after a shower, suspect drain or shower valve issues. If damage grows even when no one is using plumbing fixtures, think of the supply line.
Check the most common hidden leak locations
Some places fail more often than others, and those should be inspected first.
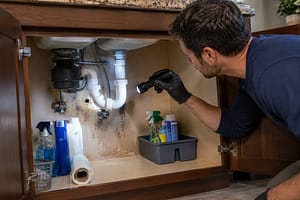
Under sinks, remove stored items and use a flashlight. Look for swelling in the cabinet base, rust on shutoff valves, mineral buildup on supply connections, and dampness around the drain trap. Around toilets, feel the floor near the base and inspect the supply line and shutoff valve. A failed wax ring can mimic other moisture problems, while a supply leak tends to be more constant.
Behind washing machines and refrigerators, look for corrosion, soft drywall, or damp flooring. Water heater areas should be checked for rust streaks, pan moisture, dripping relief valves, and signs of leakage at threaded fittings.
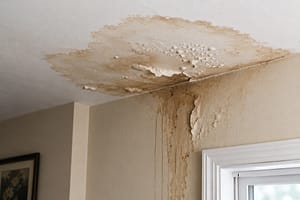
Ceilings below bathrooms deserve close attention. Even a faint stain or peeling paint can mean water is moving above the surface. In crawl spaces or basements, inspect exposed piping for greenish corrosion on copper, white mineral deposits, active drips, and wet insulation.
How to find hidden leaks in walls and ceilings
When the leak is inside a wall or ceiling, you are working with indirect evidence unless you have professional tools. Start simple. Use your eyes, hands, and nose before you cut anything.
Look for discoloration, paint bubbles, warped trim, loose tile, or drywall tape pulling away. Press gently on suspicious drywall. If it feels soft or crumbly, moisture may be trapped behind it. Musty odors often precede visible water, especially in enclosed spaces with poor airflow.
If you want to take the next step, a moisture meter is one of the most useful homeowner tools for this kind of work. It can help compare one section of the wall to another and show where moisture levels are elevated. An infrared camera can also help reveal temperature differences caused by moisture or active water movement, but it has limits. Cold or warm spots do not always equal a leak, and misreading thermal images is common without experience.
If you do open a small inspection hole, do it carefully and only after ruling out electrical hazards. Cut in an area with visible signs, and be prepared that water may have traveled from somewhere higher or farther away.
Don’t ignore slab and underground leak clues
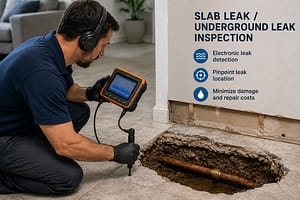
A slab leak can be expensive if it goes unchecked, but it usually leaves clues. You may notice unexplained warm spots on the floor, cracked or lifted flooring, mildew odors with no visible source, or the sound of running water when the house is quiet. In some cases, the meter moves even after visible fixtures have been ruled out.
Outdoor line leaks can show up as soggy patches in the yard, unusually green areas, erosion, or a drop in pressure. In warmer climates, irrigation leaks are common and can waste a surprising amount of water before anyone notices.
These are the situations where DIY diagnosis can only go so far. You may confirm there is a leak, but accurately locating it often takes acoustic listening equipment, pressure testing, or thermal and moisture mapping.
When a hidden leak is safe to investigate yourself
If the leak appears minor, localized, and accessible, it often makes sense to inspect it yourself first. A damp cabinet under a sink, a suspect toilet supply line, or visible moisture near an appliance connection are all reasonable places for a homeowner to start.
It becomes less of a DIY job when the leak is near electrical wiring, inside finished walls with no clear source, under concrete, or causing structural damage. If you are seeing mold growth, sagging ceilings, major flooring damage, or a meter that keeps moving with no obvious source, it is time to stop guessing.
That is where real leak detection experience matters. A professional is not just there to repair a pipe. The greater value is in confirming the source before unnecessarily opening walls or floors.
A practical step-by-step approach that works
If you want the shortest path to an answer, use a simple order. First, check visible fixtures and toilets. Next, run the water meter test. Then, if you can, isolate the zones, inspect common failure points, and use moisture clues to narrow the area. After that, decide whether the leak is accessible enough for a DIY repair or serious enough to warrant professional detection.
That sequence matters because it keeps you from jumping straight to the most expensive possibilities. Plenty of people fear a slab leak and end up finding a toilet issue or a leak in a washing machine hose instead. Just as often, homeowners keep repainting a stain that is being fed by a line leak behind the wall. A methodical check saves money both ways.
Ainstheplumber teaches homeowners to think like troubleshooters first. That means paying attention to patterns, confirming evidence, and knowing when the next step requires better tools rather than more guesswork.
A hidden leak rarely gets better by waiting. If something feels off, trust the signs, test what you can safely test, and act before a small water problem turns into a repair that affects half the room.

Recommended Tools & Plumbing Guide
As a plumber with over 20 years of experience, I’ve seen how the right tools can make the difference between a quick fix and major damage. I’ve put together a list of trusted plumbing tools and leak detection products that homeowners can use to catch problems early and protect their homes.
👉 Browse my recommended tools and products here
📘 Get my practical plumbing guide:
https://www.amazon.com/dp/B0F9ZZJCJG
— Ainsworth Dickenson
Your Go-To Plumbing Expert